How to Stain a Deck
You started your project by looking for the famous yella tag, now finish your deck with it too. YellaWood Protector® semi-transparent stain and water repellent was specifically formulated for the makers of YellaWood® brand products which means it works exceedingly well with YellaWood® products. Here are a few simple steps to take to make sure you Finish Like a Pro.

Prepping Your Deck for Stain
Common wisdom among professional wood finishers is that proper preparation of the stain itself and the surfaces to be stained is 90% of the job.
1. Purchase enough wood stain and mix thoroughly
In spite of the exacting manufacturing and quality control measures taken to ensure consistent color from batch to batch, out of an excess of caution, we recommend that multiple containers of stain intended for use on the same job, be mixed together, or “boxed” to ensure color consistency from start to finish.
It is extremely important when working with wood stain to make sure it is THOROUGHLY MIXED and remains so throughout the application time. The time tested and proven rule for mixing wood stains is to mix until thoroughly blended from the top to the bottom of the container, then mix some more. “Thorough blending” means there is no visible separation or striation of ingredients showing on the surface of the stain, and the movement of the stirring tool meets no resistance from standing solids on the bottom of the container.
2. Prepare your surface
If the surfaces to be stained are near things such as plants, fixtures or other surfaces that are not to be stained, then it would be advisable to cover and mask these areas. Unlike paint, which tends to have a thick viscosity, wood stains have a loose viscosity, making it a little more challenging to avoid drips and runs. YellaWood Protector® stains and sealants have a viscosity is formulated to minimize this risk yet flow and level smoothly on the surface without excessive film build up.
CLEAN THE WOOD
An attractive, lasting stain finish on exterior wood requires a thoroughly cleaned surface which is free of any residual material from prior coatings. Cleaning should be sufficiently thorough to remove dirt , grease, mold and mildew, other stains and discolorations. There are a number of reputable cleaners that can be used for this purpose. The entire wood surface should be lightly sanded and thoroughly dusted to remove sanding residue and any loose wood fibers.
Properly cleaned and prepared new wood will typically provide a much more forgiving and easily workable surface than older, weathered or previously stained wood, when applying wood stains. Generally, you can expect better square foot coverage per gallon of stain, with newer wood, with even coverage thickness and uniform color vs. older, particularly well-weathered wood.
SAND THE WOOD
Older unpainted or unstained surfaces will likely require some sanding and cleaning to remove discolored spots and attain more uniform surface color prior to staining. If the wood surface has been previously stained or painted, the old coating will have to be totally removed prior to applying YellaWood Protector® stain and sealer. Previously coated surfaces will need to be thoroughly sanded or stripped down to uniformly bare wood. If a chemical stripper is used, the surface will have to be thoroughly rinsed and cleaned with a neutralizing cleaner.
LET THE WOOD DRY BEFORE STAINING
Finally, after whatever wet cleaning steps have been taken, the wood should be allowed to dry sufficiently before staining to allow proper stain penetration and surface adhesion. Ideally, the wood’s moisture content should be below 15%. One method for dryness testing is to sprinkle a few drops of water on the wood surface. If the water isn’t absorbed within a few moments, then the wood is probably too wet to stain.
How to Apply Deck Stain
Suitable weather is essential for good staining results. A dry weather interval of sufficient duration is needed to allow for drying of the surface before staining, application of 2 coats of stain, and finally, for the stain to dry. Ambient temperature during application should be between 55° and 95° Fahrenheit.
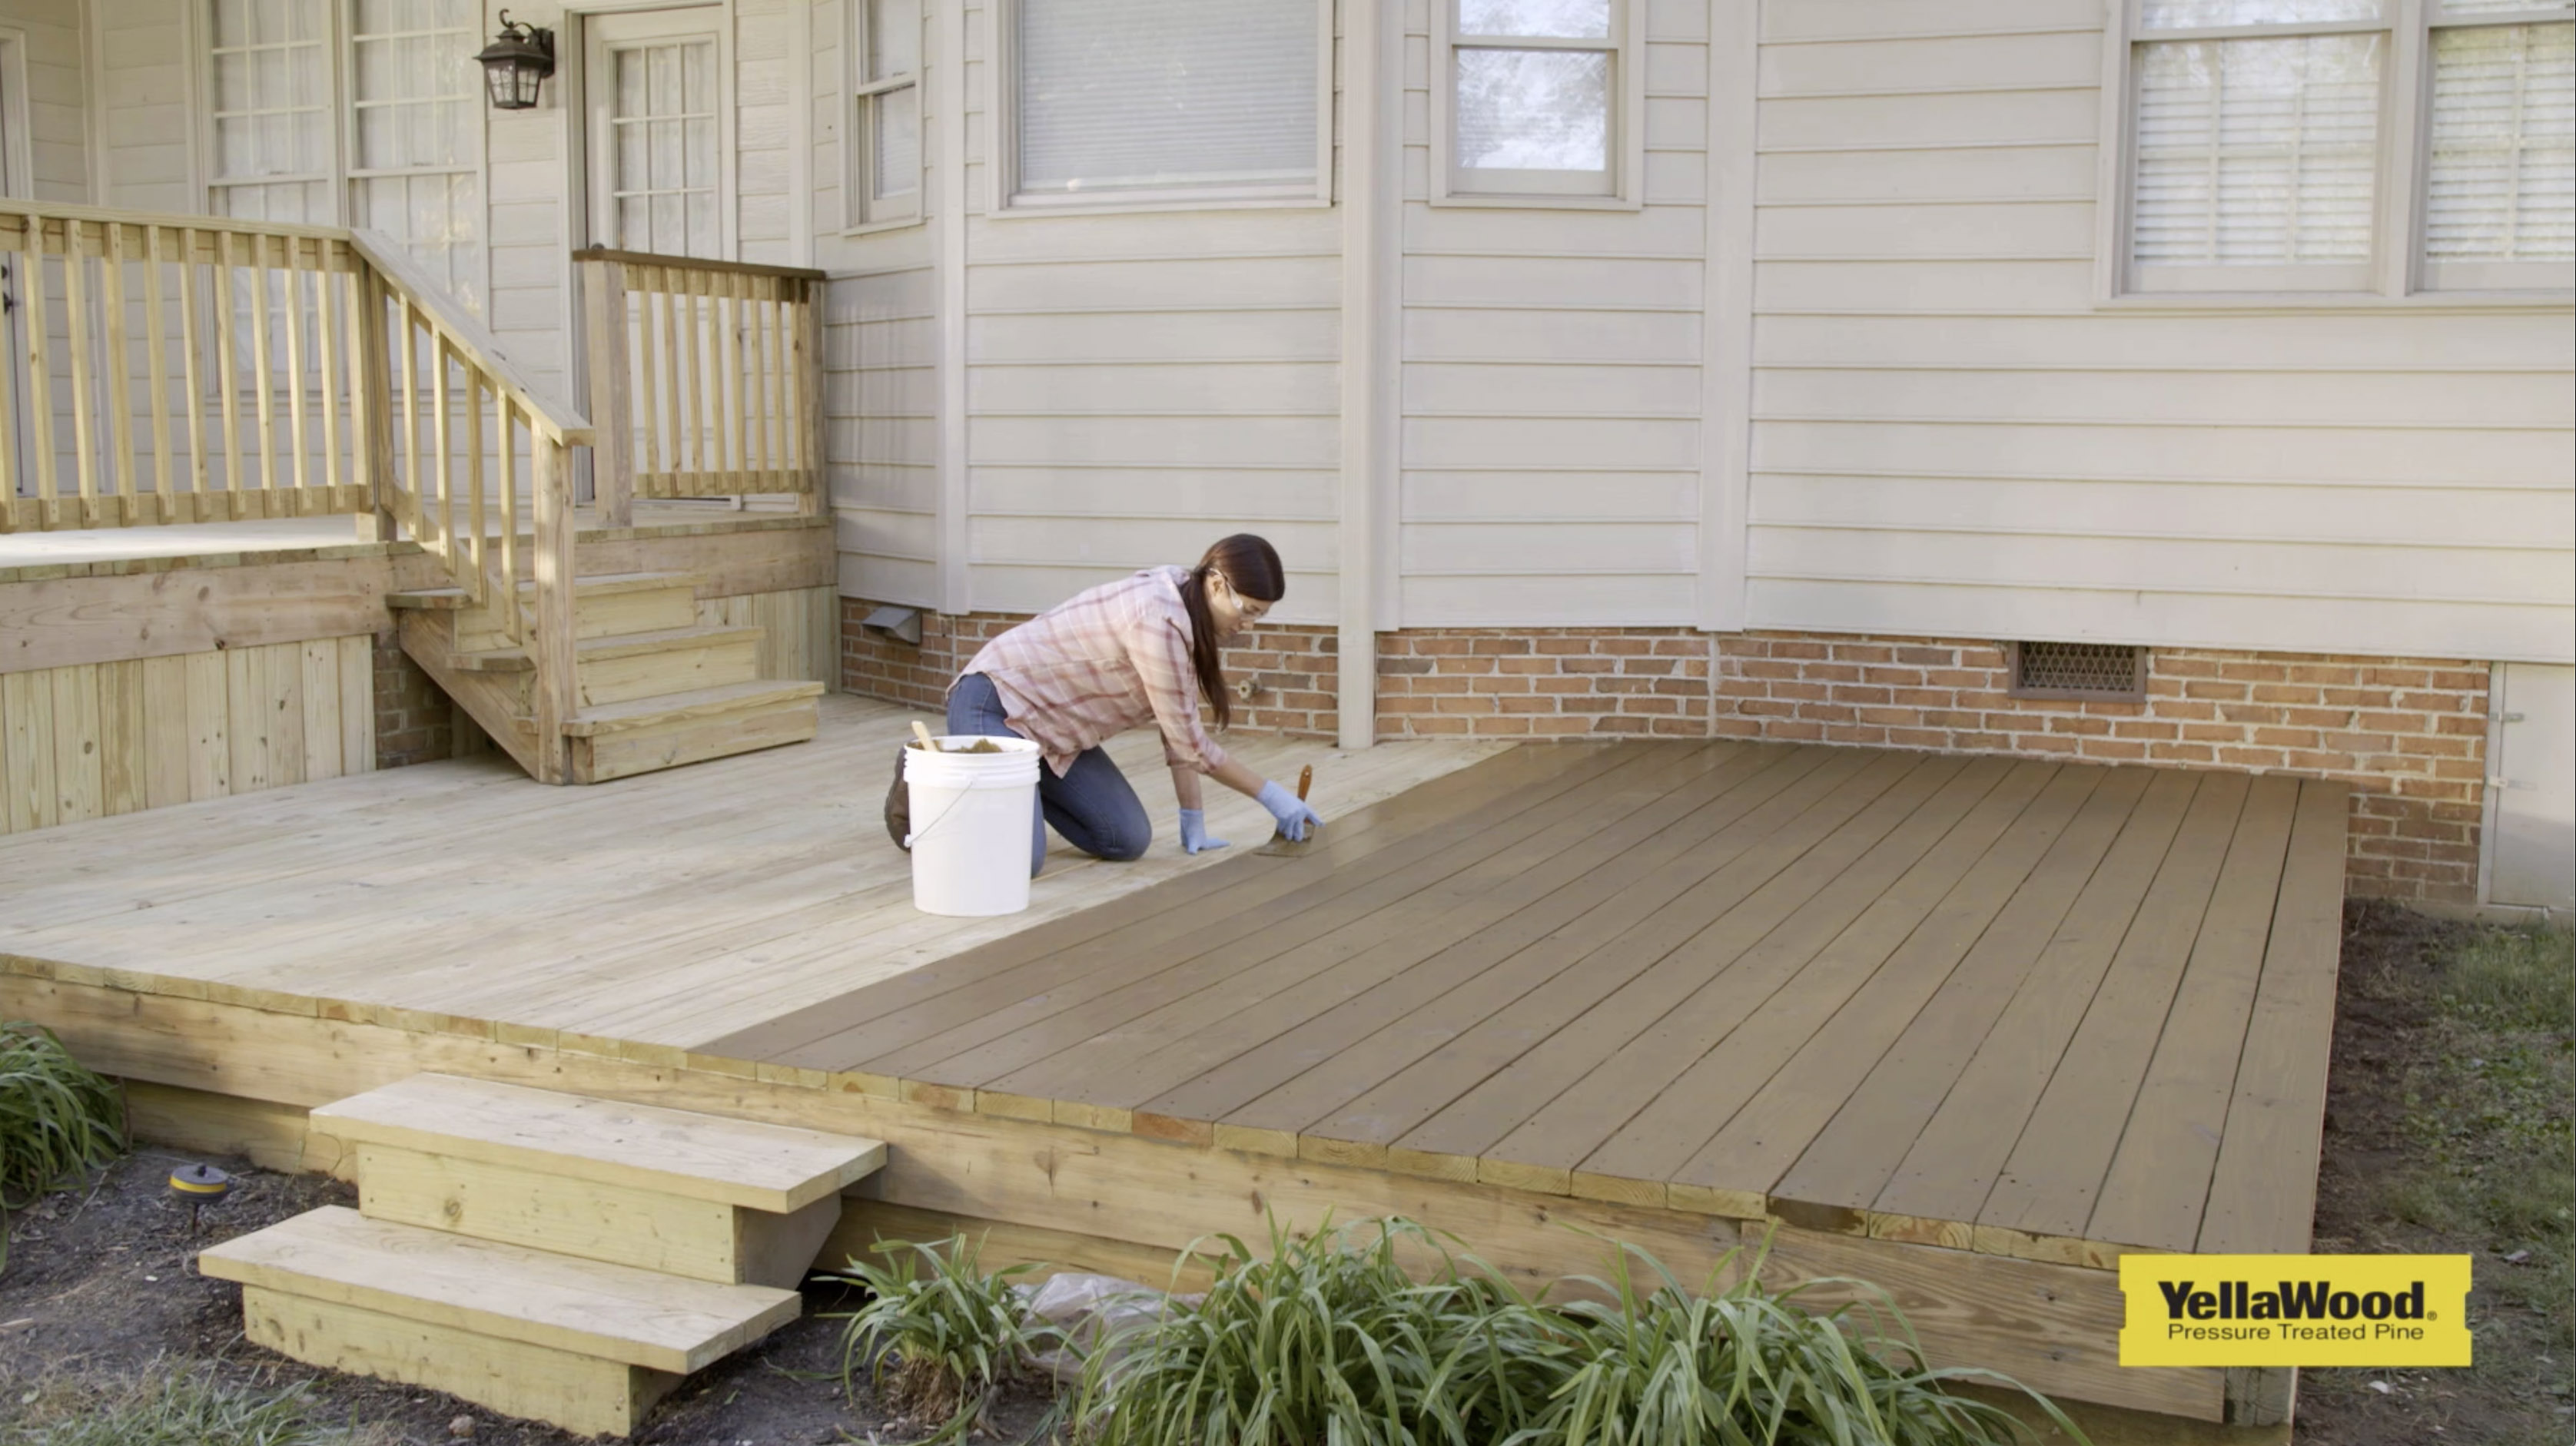
Before you stain, it’s a good idea to stain a small area to make sure the finish meets your expectations. If you need more than one can, be sure to mix all the cans together in a bigger bucket so you’ll get an even color across the entire deck.
1. Get the Right Deck Stain Application Tools
The best method for applying stain is one that provides for uniform, complete coverage, including the visible edges and ends of deck boards, as well as working the stain into the grooves and texture of the boards.
SYNTHETIC BRISTLE BRUSH
A synthetic bristle brush is probably the most labor-intensive method for application, but probably also the most effective. A brush is also the logical choice for smaller jobs, and for portions of larger jobs that are irregular or hard-to-reach, such as railing frames and balusters. Since YellaWood Protector® stains and sealer is a hybrid formula, blending acrylic and alkyd oil components, the best choice of bristle is synthetic, to provide sufficient stiffness for the acrylic component. Brush size or width should be appropriate to the surface dimension of the board being stained. A 1” or 2” brush is suggested when doing fine work such as staining trim or balusters while a 3” or 4” brush should be used when staining deck boards or fence pickets.
STAINING PAD
A staining pad is the next best choice since it facilitates even distribution of the stain and works the stain into the wood much like a brush. Attaching the pad to a long handle offers the added benefit of being able to do most of the stain application work standing up. A brush will still likely be needed to ensure the crevices between boards get thoroughly stained.
ROLLER
A roller is the third best choice of application tool. Besides also allowing most of the work to be done standing up when a long handle is used, the roller will be more efficient in terms of coverage per stroke, but will still likely require some brush work to deal with crevices and ensure a uniform coating of stain. One popular roller method is to use the roller to deliver the stain to the surface, then back-brush to fill in crevices and ensure a uniform finish without drips and runs. Roller covers should be synthetic with a 3/8- to 1/2-inch nap.
AIRLESS SPRAYER
An airless sprayer will deliver the highest initial application rate, but will almost certainly require back-brushing to thoroughly engage the stain with the wood surface and deal with uneven application areas. Airless sprayers can be rented or purchased, and the sprayer must be thoroughly cleaned following use.
2. Use Proper Deck Staining Application Techniques
INITIAL DECK STAIN APPLICATION
Initial application, regardless of the choice of tool selected, should adhere to the “End-to-End” rule. The normal temptation, especially when working at floor level, is to minimize movement from work position to work position. While this can typically be done with paint, stain is not as forgiving. Instead of finishing a section of the deck and moving to another section—which will likely create lap marks at the edge of the section—the stain should be applied to several boards at a time, working from one end of the deck to the opposite end, being sure to blend end-to-end brush strokes as you move along the length of the boards. Besides providing better coverage uniformity over the length of the board, it also makes the job of applying the second coat possible without having to walk on the as yet uncured first coat.
BACK-BRUSHING AFTER APPLICATION
Back-brushing after a roller or spray application is the essential finishing touch when applying stain. Besides ensuring a uniform thickness and tone of the stain while eliminating roller laps or uneven spray coverage, back-brushing works the stain more thoroughly into the grooves and texture of the wood. The more the stain is “encouraged” into the wood and not just left to rest on the surface, the better the look and durability of the finished results.
APPLY TWO COATS OF STAIN
Two thin coats will provide the best possible penetration by the alkyd components with an optimal acrylic top coating and curing between the two ingredients. A thick single coating won’t allow for proper penetration of the oil and the surface film coating will build up as a result. The interval between coats should be around 20 to 30 minutes depending on surrounding temperature. A rule of thumb is to allow the sheen on the first coat to start fading before applying the second coat. If the interval is too long, the two coats will not cure together as desired, and the first coat’s water repellency will interfere with proper bonding between the coats.
3. Dry and Cure Your Deck Stain
The surface of the final coat of stain will likely dry to the touch in less than 24 hours, and the final thorough curing of the finish will take at least 72 hours. Both drying and curing intervals will depend on ambient temperature and humidity. It is possible to put a covering over a newly stained surface to protect it from damp weather while drying. The covering should not be in contact with the stain surface and must allow for sufficient ventilation and air movement over the stained surface.
4. Clean Up After Staining Your Deck
The worst part of the job is made considerably easier with the choice of YellaWood Protector® stains and sealer. The hybrid formulation gives you the benefits of a penetrating oil finish without having to work with solvents or mineral spirits to clean up tools, or deal with occasional drips or spills. Soapy water will be all that’s required in the clean-up process.
You’ll need to let your deck dry for a day or two before bringing the furniture back out, but it will be dry enough for light usage in 6 hours or so depending on the temperature and humidity. Finish Like a Pro with YellaWood Protector® semi- transparent stain and clear water repellent.
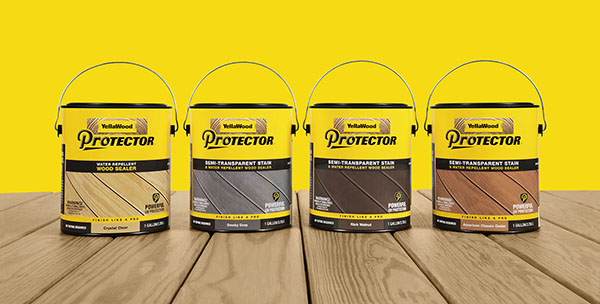
YellaWood Protector®
Deck Stain & Sealer
YellaWood Protector® semi-transparent stain and water repellent.
How to Stain a Deck with YellaWood Protector
Step-by-step instructions for how to stain a deck with YellaWood Protector semi-transparent stain and water repellent.